Thursday, August 30, 2012

Hokkaido Chiffon Cupcakes

Hokkaido Chiffon Cupcakes


I'm so "out-dated"! According to the internet, it seems that these little cupcakes can be easily bought from  bakeries in Singapore and Malaysia. However, despite my many trips back to Singapore and Malaysia, I am ashamed to say I've never tried them!

I found this cake while searching on the internet for an easy recipe to use up all my left-over custard cream from my earlier cream puffs experiment. Combining two of my husband's favourite chiffon cake and custard cream - this cake is perfect for using up my cream fillings.

OMG!!! This cake is heavenly. Fluffy soft cake with smooth creamy custard... It's so good! For a baking novice, I do say mine turn out beautifully. I can't wait to try one of these when I next return to Singapore. =)

Fluffy soft cake with smooth creamy custard

***********************************************************************

Recipe 

(Makes 8 cupcakes)

For chiffon cake
3 egg yolks
20g sugar
35g corn oil / vegetable oil
60g milk
70g cake flour

3 egg whites (at room temperature)
1/4 teaspoon cream of tartar (optional)
25g sugar

For custard cream
1 box of French Vanilla Pudding
1 1/2 cup cold milk
1/2 cup cold heavy whipping cream
1/2 teaspoon vanilla extract
1/4 teaspoon of extra-fine sugar / powdered sugar (optional)

For Custard Cream
1. Mix the french vanilla pudding with milk. Set aside in fridge.

2. Whip cream, vanilla extract and sugar with cold mixing bowl and whisk until stiff.

3. Fold in 1/3 of the cream into the french vanilla pudding. Add this mixture into the rest of the cream and fold in gently until all cream has been mixed into the pudding. Set aside in fridge.


For chiffon cake
1. Pre-heat oven to 330F.

2. Arrange paper liners on baking tray.

3. Hand whisk egg yolk and sugar till pale in color.

4. Add in corn oil and milk, continue whisking till combined.

5. Sift in cake flour, continue whisking till combined.

6. Using either stand mixer with whisk attachment or electric hand beater, beat egg white and cream of tartar till foamy.

7. Add in the sugar in 3 separate additions while beating at high speed till just firm peaks form.

8. Take 1/3 of egg white and fold into the egg yolk batter with a spatula.

9. Make a hole in the center of the remaining egg white and pour in egg yolk batter.

10. Fold in all the egg white into the egg yolk batter until well combine.

11. Scoop batter into paper liners until 3/4 full.

12. Bake for 30 mins or when toothpick comes out clean.

13. Remove from oven and use a small knife to poke a 1 cm hole in the surface of the cake.

14. Leave cakes to cool.

Serving Instructions
1. Pipe custard cream into the cupcake using the hole poke earlier.

2. Dust with powdered sugar.

3. Left-over cakes should be refrigerated.

***********************************************************************

Tips and Tricks

1. Do not overbeat the egg white. You can refer to the Kitchn for guide on egg whites.

2. Poke the hole in the top center while the cake is hot.

3. Make sure the cakes are completely cool before piping the cream. Otherwise, cream will melt. So make the cakes 2 ~ 3 hours in advance.

3. Pipe the cream just before serving.

4. Use free standing muffins cups for these recipes.

Adapted from Forbidden Garden.

Wednesday, August 29, 2012

Simple Cream Puffs

Cream Puffs

Have you ever had cream puffs from Beard Papa? Those crunchy puffs filled with vanilla cream are one of my favourite dessert. The first time I tried these puffs was ten years ago, during a holiday in Hong Kong, with a close friend of mine. The aroma of the vanilla cream filled the supermarket at SOGO. It was this aroma that led me to try my first puff.

At US$2 a pop, these yummy puffs don't come cheap, but I never thought of making them. That was until I came across its recipe while searching for custard recipe. The puff recipe was so simple, I had to give it a try!

The final verdict from my family - Taste just like Beard Papa! =)

Custard Cream Puffs


Recipe (Custard Cream Puffs)

Makes appx. 16 cream puffs


(For Puffs)
1 cup water
1/4 teaspoon salt
1/2 teaspoon sugar
1/2 cup unsalted butter (cut into cubes)
1 cup flour
4 large eggs

(For Custard Cream)

1 box of French Vanilla Pudding
1 1/2 cup cold milk
1/2 cup cold heavy whipping cream
1/2 teaspoon vanilla extract
1/4 teaspoon of extra-fine sugar / powdered sugar (optional)

For Custard Cream
1. Mix the french vanilla pudding with milk. Set aside in fridge.

2. Whip cream, vanilla extract and sugar with cold mixing bowl and whisk until stiff.

3. Fold in 1/3 of the cream into the french vanilla pudding. Add this mixture into the rest of the cream and fold in gently until all cream has been mixed into the pudding. Set aside in fridge.

For Puffs / Shells
1. Whisk salt and sugar into water.

2. Place water and butter into a saucepan and bring to a boil. (Do not use non-stick pot / pan).

3. Remove pot away from heat. Add in all flour at once. Stir until combined.

4. Place pot back onto stove and continue mixing the flour until dough comes away from pan, forming a thick smooth ball. (about 1 minute)

5. Place dough  in a mixing bowl. Allow to cool for 2 minutes.

6. Once the dough is lukewarm, use either a stand mixer with paddle attachment or electric hand beater, whisk in the eggs one at a time.

7. Continue mixing until you have a smooth thick paste. (see video)

8. Spoon dough onto baking sheet lined with parchment paper.

9. Place in pre-heat oven at 400F for 15 minutes. Reduce heat to 350F and continue baking for 30 minutes or until puffs have a nice amber color.

10. Remove shells from oven. Poke 2 holes on the sides of each puff.

11. Turn off oven. Place puffs back onto baking sheet and back into oven. Leave the oven door slightly ajar.

12. Let puffs completely cool inside the oven.

13. Place custard cream into a piping bag and pipe in the cream into the holes of cooled puffs. OR cut the cooled puffs into half and use spoon to scoop cream into the puffs.

14. Dust with powdered sugar and served. (Optional)

***********************************************************************


Monday, August 27, 2012

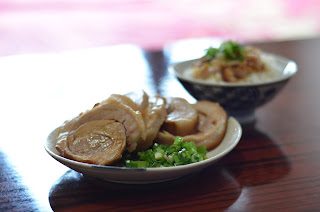
Japanese Chasu

Japanese Chasu

Japanese Chasu is quite different from the Chinese Chasiu. Japanese Chasu is mainly roast pork in soy sauce while Chinese Chasiu is a barbecue pork with soy sauce and hoisin sauce. Japanese Chasu often uses the pork belly meat while Chinese Chasu mainly used the pork loin meat.

I love the round Japanese Chasu that you often find in a bowl of delicious ramen. After all, what's not to love about this juicy dish - with layers of fats and tender meat melting in your mouth at every bite. Yummy-licious is the word for it.

Japanese Chasu rice
One of our favorite Chasu from Santouka. We never failed to order an extra bowl of Chasu rice when we visit Santouka. The Santouka's Chasu uses mainly pork cheeks meat which is one of the fattiest meat of the pig but the most tender. You can get pork cheeks meat at many Chinese supermarket. It is sometimes also called pork neck meat. However, it's difficult to achieve the round Chasu shape with pork neck meat, so I chose to use pork belly meat for my Chasu recipe.

After searching through various blogs, I combined and tweaked the recipes from Just One Cookbook and No Recipe to come up with my easy to make Chasu recipe.

Japanese Chasu with rice


Japanese Chasu

Recipe


2 piece of pork belly meat (2 pounds each - request your butcher to remove the skin)
2 tablespoon of Konbu Cha or salt 
3 cup water
4 tablespoon sugar
4 tablespoon miso
6 tablespoon soy sauce
8 tablespoon mirin
8 tablespoon sake
30 grams ginger (slice into 4 ~ 5 pieces)
8 cloves garlic (smashed)
1/2 tablespoon of white pepper corns
1 stalk of green onion (cut into 4 inches)

1. Rub the pork belly with Konbu Cha or salt.

2. Roll the pork belly into a round shape. Using the pork belly skin, wrap around the meat and secure with string. If you don't need the round shape, cut the pork belly into 4 quarters.

3. Put all ingredients into a pot. The sauce or water should cover 3/4 of the pork.

4. Cover the pork with an Otoshibuta. Make sure that all corners of the pot is covered and steam is only coming out of the holes of the Otoshibuta.

5. Cooking over medium high heat for approximately 10 minutes. Once it starts to simmer, lower the heat to medium low and cook the meat for approximately 2.5 hours.

6. Check the meat occasionally after 2 hours. Turn off heat when there is only 1 inch of the liquid left. The liquid should have thicken and is shiny.

7. Wait for meat to cool completely before slicing.

******************************************************************************************************

My Kitchen Aid Artisan Mixer

Kitchen Aid Mixer Package
 It's finally here! I was making dinner, when my husband brought in the mixer. Excited, I told him to open the package. After approximately 5 minutes of "struggling" with the boxes, we finally got it out.

My pink Kitchen Aid Stand Mixer
Weighing at 27 pounds, the mixer is not a light-weighted item for the pint size me. We checked the attachments and were pleasantly surprised that they were made of steel. When we saw the picture of the white flat beater and the dough hook... we thought it was made of plastic! Yes, I wanted a KA mixer so much, I didn't even checked it out at the store before I bought it... =)

At first look at the mixer, my husband went "No professional cook uses a PINK mixer"... Hahaha ... I'm glad I'm just no professional cook. =) I'm a happy woman with a pink mixer.

With it's arrival, I'm planning a week of baking to test out the mixer. So look for more baking posts coming up soon. =)


Tuesday, August 21, 2012

A hike along Cystral Spring

A road closure, a "lost" husband and an impromptu decision, that's how we ended up in front of Crystal Spring park. With my husband wanting to test his new camera, we decided to go for a hike at the park. 

Thinking it would be a short hike, we took only our camera and phones and set out. The trail looks relatively easy with paved roads. Being a sunny day, there were many families, bikers and joggers. No dogs is allowed at Crystal Spring park. 

Although I'm not particularly athletic, I love to go hiking with my husband. Walking through the trees and lakes, with no disturbance, we can talk for hours as we enjoyed the view. We would try to keep up with each other or slow down when one can't catch-up. I always find hiking a good way to improve our relationship. 


We had no idea how long the trail was as we did not checked out the trail map and information at the entrance. We had wanted to complete the trail but an hour later, and still no sign of the end of the trail, we decided to turn back. Half-way back, we realized that we totally forgot to bring water with us. Thirsty and tired, we were glad to finally "struggle" back to our car.

Well, lesson learnt - remember to read the trail map and bring water before starting a hike. Regardless, we enjoyed our hike and had a great day.

Foodsteps of Anthony Bourdain

Hot Coco at Pambiche
We decided to drive up to Portland, Oregon over the July 4th holidays. An avid Travel Channel fan, I automatically look up what to eat at Portland and with my husband being a true Anthony Bourdain fan, we decided to follow the footsteps of Anthony Bourdain. A quick check on Travel Channel, we noted that Anthony visited only two restaurants in Portland, which was do-able for us as we are staying in Portland for just 2 days. With that, we planned for dinner at Apizza Scholls and a doughnut dessert from Voodoo.


Apizza Scholls

We made reservations for 7:30pm and was seated on time. A great start. :) I noticed that there were a crowd coming in without reservations and the wait is approximately 45 minutes. Thus, I highly recommend you making reservations before dropping by, especially if it's the weekend and you have a large group.

Margherita & Tartufo Bianco
Upon settling into our seats, the waiter was quick to inform us that we could order "half & half" which means we could get half of two different pizza. This is great as we wanted to try both of their famous pizza - the Margherita and the Tartufo Bianco. Note that there is no meat in both pizza. With a meat eater husband, we added anchovies to the Margherita and sausage to the Tartufo Bianco.

Verdict - Our anchovies Margherita pizza was unique. The anchovies added a taste of sea and saltiness to the Margherita. However, without the anchovies, it's just a good tomato based pizza.

The sausage Tartufo Bianco was a burst of truffle goodness. My husband had no idea what I had ordered. Clueless, he took a bite and immediately, told me that there's an aroma that's enhancing the cheese in the pizza. I believe the truffle oil added to the pizza improved the taste of the pizza, you get a more distinctive taste of the cheese with each bite.

On the overall, the pizza are not mind-blowing. It was a busy night and we were served promptly. A night ending with good food and service - a great ending before we left Portland.

Voodoo Doughnut

Voodoo Doughnut

Our next stop was to Voodoo Doughnut. Anyone who had watched travel channel, would have heard of Voodoo Doughnut. I mean Andrew Zimmerman (Bizarre Food) and Adam Richman (Man vs Food) had visited this joint. With such fame, no true travel channel fan would leave Portland without a visit to Voodoo.

Voodoo, Bacon, Oreo Cookie and Rice Krispies

There was already a line when we reached the shop. We quickly got into line and finally, after a 20 minutes wait, it was our turn. We got the famous Voodoo doughnut, Bacon doughnut, Oreo Cookie doughnut and Rice Krispies doughnut.  

The Voodoo doughnut is fun but there's too much jam for my taste. There is a good mix of sweetness and saltiness with the bacon doughnut. The Oreo Cookie and Rice Krispies doughnuts are too sweet for my taste.

Verdict - On the overall, I don't find the doughnuts any tastier than Krispy Kreme or Dunkin Doughnuts. However, Voodoo doughnuts does has a lot of variety. So if you like doughnuts, it's worth a visit.

Off Anthony's Track... Pambiche

After a quick check on Yelp, we decided to make a stop at Pambiche for dinner on our first night. Pambiche is a Cuban restaurant and I never had Cuban food before, so I was excited. Upon arriving at Pambiche, it was vibrant and colorful with a crowd already waiting for table. After putting our names down, we waited for 30 minutes before we got seated. There are both indoor and outdoor seating. We were seated indoor.

Plato Cubano

We ordered two entrees - Plato Cubano and Camarones al Ajillo. The roast pork in Plato Cubano tasted like dry Japanese cha-siu and the Camarones tasted like overcooked garlic prawns. Needless to say, I was not impressed. However, my husband loves the food. He like to fresh, limey and minty spices used in the food. He says the spices whet his appetite, making each bite refreshing. Hmmm ... I guess food is very subjective.

Camarones al Ajillo
Overall - The food is good and the environment is fun. If you like Mexican food, you probably enjoy the food as much as my husband. :)

Have you ever follow Anthony's steps? Where did you go?

Monday, August 20, 2012

Ramen at Mitsuwa (Santouka)

Salt flavor ramen from Santouka
I need a ramen fix! I've been bugging my husband for ramen since last weekend. Finally, he gave in and we drove down to Mitsuwa on Sunday to get my favourite ramen from Santouka.

Santouka shop at Saratoga, CA

For a little ramen shop located at the foodcourt of Mitsuwa, Santouka has its share of loyal followers. Come lunch time, the queue can sometimes extend to the the entrance of Mitsuwa. However, the wait is relatively quick. You basically queue for the order and wait approximate 30 minutes for your ramen to be ready. For us, the wait time often flew by quickly... the foodie in us will always make use of the waiting time to get some sushi and drinks from Mitsuwa. =)

Plate of Cha-siu from Santouka

Santouka is a ramen chain store founded in Japan with locations in many parts of the world. I love the salt flavour ramen - there's something about those chewy noodles and yummy soup that makes me asking for a bigger stomach to eat more. BUT, the best thing from Santouka is the cha-siu! That cha-siu is so good. Those slices of pork has the right amount of fats and meat, with the fats melting away the instant it hits your mouth. Drawing out the flavour of the cha-siu, together with the tender meat and melt-away fats- you get a mouthful of yummy-licous as you chew away at the cha-siu.
 
Cha-siu rice from Santouka
  
Another favourite of ours at Santouka is the cha-siu rice. Well, with cha-siu that good... you can't go wrong with this order. I find that matching the cha-siu with rice allows you to get a better taste from the cha-siu sauce which takes the cha-siu taste to a whole different level. Not to get me wrong, eating the cha-siu together with the noodles is great, but I find that some of the cha-siu sauce flavor is often lost within the ramen soup. To get a true taste of the sauce, it's best to eat it with some rice.

After satisfying my ramen craving, I decide to start a "ramen" making series. So watch out for my blog as I tried to make those yummy-licous cha-siu, ramen and eggs in the next few weeks...

Friday, August 17, 2012

Kitchen Aid Stand Mixer


Kitchen Aid Mixer Reviews

KitchenAid Stand Mixer


I'm excited! My husband called this morning to inform me of an on-going sale at Everything Kitchens and the stand mixers from Kitchen Aid is one of the sale item! I was super excited (literary forgot about my breakfast cooking in the pot!!!) ;p

[Note - Everything Kitchens is now offering free delivery and no sales tax. Use coupon code [returncustomer] for additional $5 off. Kitchen Aid is offering $30 rebate until 9/1/2012 for all 5 Qaurts models (print rebate form online). I  was not compensated monetarily for this post.]

I never did much research on the stand mixers and don't know which model to order. All I knew was I wanted a Kitchen Aid mixer from all the television's shows that I had been watching. So I spent my morning checking out the various Kitchen Aid  mixers.

I found the below video useful when trying to understand each model.


Basically, there are five models of KA mixers and below list some of the key features.


Model Classic Artisan Pro 500 Pro 600
Model Number K45SS KSM150PS KV25G0X KP26MIX
Price $229 $244 $261 $335
Motor (Watts) 250 325 450 575
Quarts 4.5 5 5 6
Heavy Duty No No Yes Yes
Tilt-up Head Yes Yes No No
Bowl Lift No No Yes Yes
Amazon Rating 4.4 4.7 3.9 4.2


If you want more information on each model, please refer to below for details.

  
******************************************************

KitchenAid Stand Mixer 4 1/2 Quart - Classic (Model K45SS)


KitchenAid Stand Mixer 4 1/2 Quart - Classic (Model K45SS)

KitchenAid Classic Mixer Features:
  • 250 Watt Motor
  • Tilt-up Head
  • 10-Speed Solid-State Control
  • 4-1/2 Quart Stainless Steel Bowl
  • Capacity for Kneading Two Loaves of Bread

My Conclusion - Cheapest and good for light home usage.


This is the cheapest model and is currently selling for $229 (after discount code of $5). This has a tilt head and comes with 3 attachments as seen in the picture. This model is best use for light to medium duty use. With a smaller motor, it is not expected to prepare large batches of dough. If you are thinking of making anything more than 2 loaves of bread, this is not a machine for you. For more heavy duty usage, consider the Pro-series (see below for reviews).


There are complaints that the dough does not mix well when it is overloaded. Otherwise, this is model is good for light and simple home usage.


Currently, I do not see much of a discount on this model. So if you are interested in getting the classic and can wait, I suggest checking at Macy's or Target during Thanksgiving (black Friday) for better deals.


  ******************************************************

KitchenAid Artisan Mixer Features:
  • 325 Watt Motor
  • Tilt-up Head
  • 10-Speed Solid-State Control
  • 5 Quart Stainless Steel Bowl with Handle
  • Unique Mixing Action

My Conclusion - Good for slightly heavy home usage and less noisy than the Pro-series. Value for money.

This model is currently selling for $244 (after $30 mail-in rebate and $5 discount code). This comes with 4 attachments as seen in the picture.


Both the Classic and Artisan models have a tilt head which basically means that the top of the mixer tilts up to remove the bowl, versus lifting the bowl up and down with a lever.  Also, similar to the Classic, the Artisan is not designed to handle heavy duty preparation. For more heavy duty usage, consider the Pro-series. However, a point to note is that the Pro-series mixers are very loud. Both the Classic and Artisan are quieter than the Pro-series.


Compared to the Classic, this has slightly more motor power and many find that the dough mixes better with the Artisan. The stainless steel bowl for the Artisan comes with a handle on the side (see picture). Many reviews favour the handle; indicating that it is easier for locking and unlocking the bowl. In addition, the Artisan also comes with a pouring shield attachment tto help keep splashed off of you while mixing. 


Based on the current prices, I would buy the Artisan vs Classic ($15 differences) as the Artisan has more motor power and there are more than 20 different colors to choose from. Definitely a great way to add some personality into your kitchen.


  ******************************************************

KitchenAid Professional 5 Plus 5 Quart (Model KV25G0X)


Kitchen Aid Pro 5 Plus Features:
  • 450-watts
  • Bowl-lift design
  • 5-quart polished stainless steel wide-mouth bowl with handle
  • Direct drive transmission, all-steel gears, and all-metal construction
  • Commercial-style motor protection
  • Includes Powerknead™ Spiral Dough Hook, flat beater, and stainless steel wire whip
  • Multipurpose attachment hub with hinged hub cover

My Conclusion - Lower end of the Pro-series. Complaints of break downs.


This model is currently selling for $261 (after $5 discount code and $30 mail-in rebate). This comes with 4 attachments as seen in the picture. The Pro 500 mixer can handle a larger amount of dough. According to Kitchen Aid, the Pro 500 mixer can tackle up to 12 cups of all-purpose flour. 

From the various reviews, my understanding is that the mixer will jam or vibrate violently if you put in too much of a dough. Also, there are many complaints that the Pro 500 breaks down easily. 

If you need a heavy duty machine and do not want to pay for the Pro 600, then the Pro 500 is for you. 

Compared to the Artisan, the Pro 500 can handle more dough power. It is slighter heavier (about 4 pounds heavier), so may be difficult to move around. Also, the Pro 500 is taller than the Artisan as the Pro 500 is a bowl lift design. The Pro 500's bowl lift up and down with a lever on the side. The head of the Pro 500 does not move.

  ******************************************************

Thursday, August 16, 2012

Lemon Infused Madeleine


Madeleine
Lemon-infused Madeleine


Lemon Infused Madeleine

Madeleine is a traditional small cake from the northeastern region of France and very often, can be identified by it's distinctive shell-like shape . It is similar to eating a lighter version of a very small sponge cake. (Adapted from Wikipedia)

Before moving to the States, I had never eaten a madeleine and doesn't even know of its existence. So when my darling husband picked up a huge box of Sugar Bowl's madeleines and declared it as one of the best tasting pastry during one of our Costco's shopping trips, I was intrigued. A quick check on the portion, we decided against buying the box of madeleines as there's only two of us and it would take us a long time (plus a lot of exercise!) to finished the whole box. Needless to say, I was slightly disappointed.

A few days later, my darling surprised me with a madeleine (i.e. one piece). It turns out that my husband's office often occasionally Sugar Bowl's madeleines from Costco, he decided to bring one home for me to try. It was love at first bite! :)

After searching the internet, it turns out the it isn't too difficult to make madeleines. With that, I bought a nice madeleine pan on amazon and started my baking frenzies. :)


Recipe (Yields about 16 large Madeleine)

Ingredients for dough

140g sugar (3/4 cups)
Lemon zest from 1 regular size lemon (more if you like it to be lemony)
3 extra large eggs (room temperature)
1 teaspoon of vanilla essence
1/4 teaspoon of lemon juice
(If you like it to be more lemony, you can add in up to 2 teaspoon of lemon juice.)
140g all purpose flour (scant 1 cup)1/4 teaspoon baking powder
140g unsalted butter (room temperature)


For greasing and dusting of pan
25g all purpose flour
25g unsalted butter (soften to room temperature)

1) Mix sugar and lemon zest together. Set aside for 1 hour in room temperature.

2) Lightly whisk all ingredients the eggs, vanilla essence and lemon juice. Set aside.
Stop when you can't see streaks of the vanilla essence.

3) Sieve flour and baking powder into a separate bowl.

4) Melt the butter in microwave for 30 seconds. Leave to cool at room temperature.

5) Grease the pan with butter, then lightly dust the pan with flour. Tap away excess flour by inverting the pan.

6) Using a hand-held electric egg beater, beat the sugar and eggs mixtures together until thick and foamy.
Stop when the mixture resemble thick melted cheese. (about 3 ~ 5 mins on high)

7) Fold in the flour into the batter.

8) Fold in the butter.

9) Pour mixture into pan. Do not fill more than 75% of each shell.

10) Bake in a 375 F oven for 15 mins to 20 mins. 
Ready when a toothpick comes out clean.